Thursday 30 June 2016
Setting up local Git Repository to Xcode Project in Mac
Setting up local Git repository for Xcode project on Mac
At this post, We are going to see how to set up a local Git repository in our Mac machine. There are two cases, in which you can setup git repository for the project.
Case 1: Enable Git Repository for a New Xcode project
Amazing developer friendly Xcode itself provides the feature to enable the Git repository. Here, I am going to create an iOS project enabled with Git repository.
1. Open Xcode from the Application folder
2. Select File-> New -> Project. Then the following window will be presented. From this window select iOS tab and under iOS project choose 'Single View Application' template

3. Then click Next, It presents the following screen
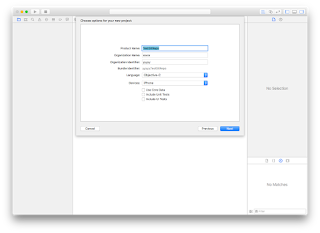
4. In this panel, Enter the project name as 'TestGitRepo' and enter the Organisation name as your organisation name. By default it will be your machine name. And enter 'Organisation Identifier'. I am entering those as 'xxxxx' , 'yyyyy' respectively.
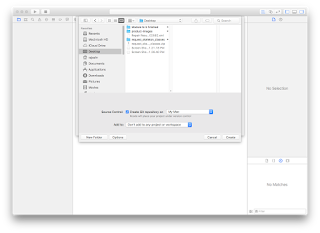
5. Then click Next, It shows a panel with which, you have to save the project in our desktop folder. And There is a check box 'Create Git Repository on My Mac'. Tick that checkbox. By default the 'My Mac' is selected no the dropdown menu. Lets leave it as it is.
6. Click create. This will create a new iOS Xcode project enabled with local Git repository.


7. Then type git commit "Git is initialised" command to commit the changes done to the repository. Now All is set. Your existing project is configured with Git Repository.

4. In this panel, Enter the project name as 'TestGitRepo' and enter the Organisation name as your organisation name. By default it will be your machine name. And enter 'Organisation Identifier'. I am entering those as 'xxxxx' , 'yyyyy' respectively.
5. Then click Next, It shows a panel with which, you have to save the project in our desktop folder. And There is a check box 'Create Git Repository on My Mac'. Tick that checkbox. By default the 'My Mac' is selected no the dropdown menu. Lets leave it as it is.

6. Click create. This will create a new iOS Xcode project enabled with local Git repository.
Case 2: Enable Git Repository to an existing Xcode Project
In some cases, We would be having the project already without any repository control management. To enable Git Repository to that already existing project. We are going to use a Utility Application named 'Terminal'.
We wil see this in the following steps:
Note: Consider I have an existing project named 'GoodCars' in my desktop folder.
1. Open the terminal application from the 'Applications'. The following window will open, It will be pointed to your root folder.

2. There type cd desktop . Then the current folder will bd changed to desktop as following screen.

3. Then type cd GoodCars. Now the current folder is changed to our project folder. We can check that by typing pwd on that window.

4. Now, we going to do the work for our main objective. Once the terminal window current directory is our project directory. Then It's sure that, we are ready to configure the Git Repository to our existing project.
5. Type git init command. This initialises the git repository to that project. You can check that. There are some hidden folders are created named .git


6. Type git status command, which tells that, the git is initialised and all the files and folders under the root folder as modified. This means that those files/folders are not added to the repository.

6. After this git initialisation. we have to add all the existing files to the repository. Type git add --all command, which will add all the files to the repository. Then type git status to check that the modified files are added to repository and ready to commit.

7. Then type git commit "Git is initialised" command to commit the changes done to the repository. Now All is set. Your existing project is configured with Git Repository.
Saturday 11 February 2012
iPhone SDK - How to split a UIImage into multiple images?
In this post, I have mentioned about how to split a single UIImage into multiple parts,
Below written is a method that receives a UIImage object and the number of rows, number of columns as input and it returns an array of UIImage objects in NSMutableArray object.
-(NSMutableArray *)getImagesFromImage:(UIImage *)image withRow:(NSInteger)rows withColumn:(NSInteger)columns
{
NSMutableArray *images = [NSMutableArray array];
CGSize imageSize = image.size;
CGFloat xPos = 0.0, yPos = 0.0;
CGFloat width = imageSize.width/rows;
CGFloat height = imageSize.height/columns;
for (int y = 0; y < columns; y++) {
xPos = 0.0;
for (int x = 0; x < rows; x++) {
CGRect rect = CGRectMake(xPos, yPos, width, height);
CGImageRef cImage = CGImageCreateWithImageInRect([image CGImage], rect);
UIImage *dImage = [[UIImage alloc] initWithCGImage:cImage];
[images addObject:dImage];
xPos += width;
}
yPos += height;
}
return images;
}
Tuesday 26 April 2011
Subscribe to:
Posts (Atom)